Implementing Reverse Proxy Using Nginx
This is a blog post explaining on different types of proxy servers & how to implement reverse proxy using Nginx.
Table of Contents
Nginx
NGINX is a web server designed to meet the growing demands of the modern web by prioritizing high performance, high concurrency, and low resource usage. While widely recognized as a web server, NGINX fundamentally functions as a reverse proxy server.
Let’s first address “What is a proxy server!!!”. I will try to put it simple.
Proxy Server
Every web request which is sent from the client to a web server goes through some type of proxy server. A proxy server acts as a gateway between client (you) and the internet and separates end-users from the websites you browse.
It replaces the source IP address of the web request with the proxy server’s IP address and then forwards it to the web server. The web server is unaware of the client, it only sees the proxy server.
The proxies are broadly divided into two types:
- Forward Proxy Server
- Reverse Proxy Server
Forward Proxy Server
A forward proxy is generally implemented on the client side and sits in front of multiple clients or client sources. Forward proxy servers are mainly used by companies to:
- manage the internet usage of their employees
- restrict content
- setup firewall to secure the company’s network
- bypass geo-restriction
- browse anonymously
Reverse Proxy Server
Reverse proxy servers are implemented on the server side instead of the client side. It sits in front of multiple webservers and manages incoming requests by forwarding them to the web servers.
Reverse proxy servers are generally used to provide:
- authentication, content caching on behalf of the web server
- encryption & decryption of content
- anonymity to the backend servers
- implementation of firewall
- load balancers to distribute the incoming traffic efficiently
In essence, a reverse proxy server is a gateway to a web-server or group of web-servers.
Nginx as a Reverse Proxy
When configured as a reverse proxy, NGINX sits between the client and a back end server. The client sends requests to NGINX, then NGINX passes the request to the back end.
Once the back end server finishes processing the request, it sends it back to NGINX. In turn, NGINX returns the response to the client.
During the whole process, the client doesn’t have any idea about who’s actually processing the request.
Let’s implement a simplified example of a reverse proxy.
Assuming you are on a unix based OS. Run the following command in your terminal to install NGINX.
#On ubuntu
sudo apt install nginx -y
After the installation finishes, check if the server is running with sudo systemctl status nginx command as shown
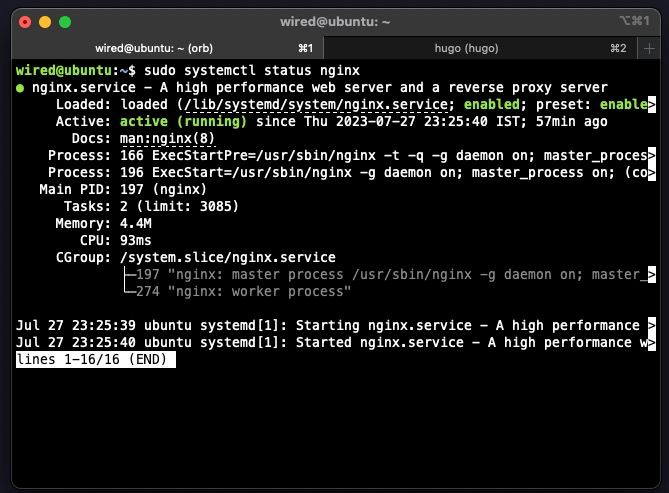
You can run sudo systemctl start nginx to start the server if it is stopped. Launch your browser & open http://localhost you will see a simple web page like this

Navigate to /etc/nginx directory to configure the server. If you list the files in /etc/nginx directory you will see a file named nginx.conf.
The nginx.conf is the configuration file of our NGINX server. By default it is populated with certain config but we will leave it untouched. Instead we will create our config from scratch.
Run the following commands to backup the default config file and create a blank new one.
# Backup existing file
sudo mv nginx.conf nginx.conf.backup

# Create new one
sudo touch nginx.conf
Now open the new config file using your favorite shell text-editor, maybe nano or vim. Write or copy paste this snippet in nginx.conf file.
events {

}

http {
    include /etc/nginx/mime.types;

    server {
        listen 80
        server_name myproxy;

        location / {
            proxy_pass "https://lobste.rs/";
        }
    }

}
If you don’t know what is going on above, don’t worry. Let me elaborate a bit.
Events- which we left empty anyway, is used for declaring global settings for the server explicitlyhttp- handles the HTTP (web) requests which are directed towards the server
Inside the server, with listen 80 we declare the port on which the server listens for http traffic. The server_name takes server alias or domain as an argument. For now you can set it to anything.
Inside location declaration, the proxy_pass directive simply passes a client’s request to a third party server and reverse proxies the response to the client.
Okay enough rocket science /s. Now Save the file & exit your shell editor. Run sudo nginx -s reload to reload the server and edit your /etc/hosts file and save this entry
127.0.0.1 myproxy
Now if you visit http://myproxy, you’ll be greeted by the original https://lobste.rs site while the URI remains unchanged.

Summary
That is how we implement a reverse proxy using NGINX. Of course this is not practical way to get into production. There is much more to it, which is a topic for future post maybe.
Hope you found this post useful. That is all for today.
Reply via mail