My Terminal Setup
Two days back I updated my Mac from Ventura to Sanoma 14.0, which was actually released for public on 26th Sep. There wasn’t much for me in it except some security updates. In the morning I started fresh & when I launched the terminal it prompted with a note asking for permission to iCloud.
I denied for simple reason – Terminal works in local file system & doesn’t need permission to iCloud. But that only made it upset, because I instantly noticed the terminal configuration broken. I was getting permisson denied error in return for every command execution.
I tried troubleshooting and fixing the issue by reinstalling the oh-my-zsh & associated theme with it but all in vain. At last I decided to perform a fresh installation of my entire Terminal setup so am documenting all the steps here as well for sharing purpose & my future self.
Terminal
The default Terminal that comes preinstalled on Mac might be okay for many users but like many other geeks, I also found it heavily limited. I didn’t even tried to adapt on with default Terminal.
I have been using iTerm2 as my terminal for almost two years now & I’m pretty darn used to it. I have tailored it to my workflow. I can launch it anywhere on my machine by simply firing up Shift + Space key binding.
The same binding minize it in the background & the terminal doesn’t show in the dock ever. It is like a floating window that I can call with a simple keystroke and then switch the focus anytime on purpose.
zsh
ZSH (Z Shell) is a popular shell among others. It is a default shell on macOS since the release of macOS Catalina. It allows you to add plugins and themes by which you can tweak the whole terminal experience.
Installation
- oh-my-zsh : is a delightful, open source, community-driven framework for managing your Zsh configuration. It comes bundled with thousands of helpful functions, helpers, plugins, themes, and so on. Run the command below to install oh-my-zsh:
sh -c "$(curl -fsSL https://raw.githubusercontent.com/ohmyzsh/ohmyzsh/master/tools/install.sh)"
- powerlevel10k - I use powerlevel10k theme for my zsh shell. Here is how to install the pl10k theme:
git clone --depth=1 https://github.com/romkatv/powerlevel10k.git ${ZSH_CUSTOM:-$HOME/.oh-my-zsh/custom}/themes/powerlevel10k
And next, set ZSH_THEME="powerlevel10k/powerlevel10k" in ~/.zshrc. Make sure to source the .zshrc config file or restart your terminal after saving the changes.
You will be prompted with onscreen instructions to configure the p10k theme or run p10k configure to initialize the configuration manually. Here is the questionairre asked and the values I choose:
- Does this look like a diamond (rotated square)? y
- Does this look like a lock? y
- Does this look like an upward arrow? y
- Does all these icons fit between the crosses? y
- Prompt style? 3 (Rainbow)
- Character set? 1 (Unicode)
- Show current time? n
- Prompt separators? 1 (angled)
- Prompt heads? 1 (sharp)
- Prompt tails? 1 (flat)
- Prompt height? 1 (One line)
- Prompt spacing? 1 (compact)
- Icons? 2 (Many icons)
- Prompt flow? 1 (concise)
- Enable Transient Prompt? yes
- Instant Prompt Mode? 1 (verbose)
- Powerlevel10k config file already exists. Overwrite ~/.p10k.zsh? y
If you did everything alright, you should get a new prompt with home icon. The directory path color is violet by default. To change the color to blue shade & have the prompt read the path of only current direcotry in the trail:
- Edit
~/.p10k.zsh& set POWERLEVEL9K_DIR_BACKGROUND=033 and - Set on the line typeset -g POWERLEVEL9K_SHORTEN_STRATEGY=truncate_to_unique (change unique to last)
- Save the chages and restart your terminal.
Plugins
I use two zsh based plugins one for autosuggestions which comes handy while traversing through directories and another one helps in better readability of files listed.
zsh-autosuggestions
This plugin suggests commands as you type based on history and completions. Run the following command to install the plugin:
git clone https://github.com/zsh-users/zsh-autosuggestions.git $ZSH_CUSTOM/plugins/zsh-autosuggestions
zsh-syntax-highlighting
This plugin enables highlighting of commands whilst they are typed at a zsh prompt into an interactive terminal. Run the following command to download the syntax-highlighting plugin:
git clone https://github.com/zsh-users/zsh-syntax-highlighting.git $ZSH_CUSTOM/plugins/zsh-syntax-highlighting
Finally to have these plugins working with zsh, edit ~/.zshrc and change plugins=(git) to:
plugins=(git zsh-autosuggestions zsh-syntax-highlighting)
Fun Part
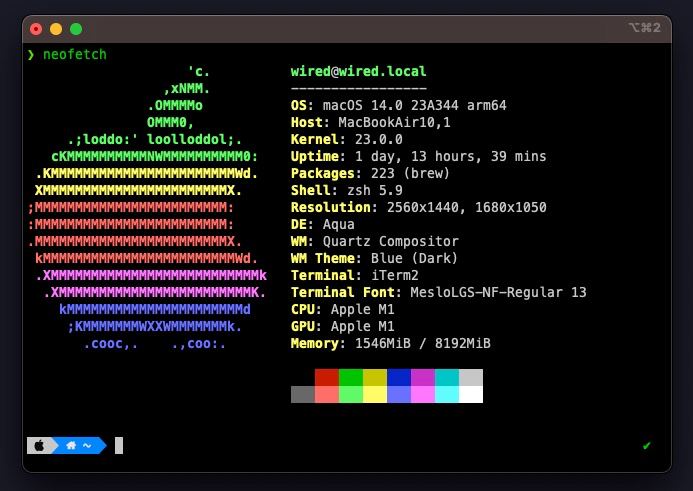
Now to display that system info in RGB color with the OS Logo install neofetch by running:
brew install neofetch
After the installation is complete, type neofetch & hit return to display system specs in that fancy format.
Summary
That is the bare bones configuration of my terminal. On the top of it I usually define custom aliases & install dozens of other CLI utilities for streamling my life in terminal. Some noteworthy mentions are fzf, autojump, ffmpeg, yt-dlp, git.
If you found this post useful consider sharing it with friends & subscribe for regular posts using RSS or Telegram.
Reply via [mail](mailto:[email protected]?subject=📝 Response to monthly review)